Posts

Showing posts from October, 2013

Webcam streaming configuration for Adobe Media Encoder

Image
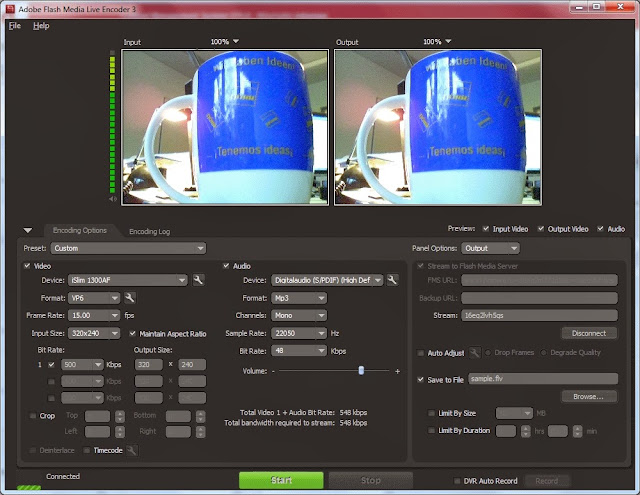
Adobe Flash Media Encoder is a software that captures audio and video and streams them to live Adobe Media Media Server or other Flash Video Streaming Service. Today Here in this post, we will configure Adobe media encoder to stream our webcam and microphone's content to Adobe media Server. For this, in the following gist you can replace the rtmp url and stream as per you need and save the file to import into your Adobe Media Encoder.     <rtmp>                 <url>rtmp://example.com:1935/live</url> <stream>channel_name</stream>             </rtmp> Once imported you just need is to hit start button and your webcam content will be streamed to your streaming server: Or you can simply import the xml file in the gist to your Adobe Media Encoder and then change the streaming url. Your rtmp url should be in FMS url area and channel name in stream area of your Adobe Media Encoder.

Google reports malware in php.net

Image
Today, opening php.net Google reported malware in the site. Here's a screenshot of it. After, I saw this I went to  http://sitecheck.sucuri.net/scanner/  to find out what the cause was. And there I found this. The site was blacklisted by Google but Malware was not identified And then I checked detail status of the blacklisting, and found it was only Google to black list among several others (Norton, ESET, and others you can see it in the screenshot ). And Google reason of blacklisting is as follows: Once, Google reported in my site to and I did really had one. Visit this link  to find out " How removed my website from Google's blacklist?  ".

FFMpeg Cheat Sheets

Image
FFmpeg   is complete, cross platform solution to record, convert,  stream  audio and video. It has the leading libavcodec library. Here in this post, I am going to post a small cheat sheet compilation I have done. Install FFMpeg Download  from  http://www.ffmpeg.org/download.html Yum users: sudo yum install ffmpeg -i Check supported codecs: ffmpeg -codecs View a files detail information ffmpeg -i input_file_name Convert wav to mp3 (128 kbps) ffmpeg -i Input.wav -ab 128 Output.mp3 Convert wmv video file to mp4 ffmpeg -i wmv_file.wmv OutputFile.mp4 Change frame rate of a video ffmpeg -i input.avi -r 24 output.avi Set video bitrate of output file ffmpeg -i input.avi -b:v 64k -bufsize 64k output.avi Record video from webcam ( webcam(laptop integrated) for me is /dev/video0 ) ffmpeg -f video4linux2 -r 25 -s 640x480 -i /dev/video0 out.avi Record Desktop Screen ffmpeg -f x11grab -video_size cif -framerate 24 -i :0.0 foo.avi Publish video to rtmp server ffmpeg -re -i video.a

Solving Cross Domain Policy Restriction

Image
For most of the web developers as beginners to video streaming applications using flash players, they come to this point of error where videos don't play. To solve this issue paste the following in crossdomain.xml file and upload it to the root of the public directory of the website ( i.e. should be available at *.domain.com/crossdomain.xml ). <?xml version="1.0"?> <!DOCTYPE cross-domain-policy SYSTEM "http://www.adobe.com/xml/dtds/cross-domain-policy.dtd"> <cross-domain-policy>     <site-control permitted-cross-domain-policies="all"/>     <allow-access-from domain="*" secure="false"/>     <allow-http-request-headers-from domain="*" headers="*" secure="false"/> </cross-domain-policy> For more secure, you can specify the domain you want to allow access in allow-access-from e.g. <allow-access-from domain="*.domain.com" /> For more

Uploading files through ftp in PHP

Image
The following script uploads readme.txt file from the local server to the specified ftp server. If you want to make ftp uploader then you could use a form to take input from the user and if input name for the file was user_file then $file should be $file=$_FILES['user_file']['tmp_name']. <?php $ftp_server="example.com"; $ftp_user_name="user"; $ftp_user_pass="userpass"; // open video file for reading $file = 'readme.txt'; $fp = fopen($file, 'r'); // set up basic connection $conn_id = ftp_connect($ftp_server); // login with username and password $login_result = ftp_login($conn_id, $ftp_user_name, $ftp_user_pass); //change to passive mode ftp_pasv ( $conn_id ,  true ); // try to upload $file if (ftp_fput($conn_id, 'uploaded_readme.txt', $fp, FTP_ASCII)) { echo "Uploaded succeed"; }else{ echo "Upload Failed"; } ?>

How to add Google Analytics to ajax pages

Image
Basically, In Google Analytic, any time tracking call is made, the activity is logged. And we most frequently use the following script: <script type="text/javascript"> var _gaq = _gaq || []; _gaq.push(['_setAccount', 'UA-29545838-1']); _gaq.push(['_trackPageview']); (function() { var ga = document.createElement('script'); ga.type = 'text/javascript'; ga.async = true; ga.src = ('https:' == document.location.protocol ? 'https://' : 'http://') + 'stats.g.doubleclick.net/dc.js'; var s = document.getElementsByTagName('script')[0]; s.parentNode.insertBefore(ga, s); })(); </script> And for tracking ajax pages, in the view file of the ajax page you need to add the url of the ajax page as follows after _trackPageview (see the blue colored change): <script type="text/javascript"> var _gaq = _gaq || []; _gaq.push(['_setAccount', 'UA-29545838-1&

Setting timezone in Linux

Image
Timezone is the basis of time calculation based on latitudes and longitudes. In Linux system, timezone configuration is saved in /etc/localtime . You can use  more /etc/localtime to see your timezone settings.  You can change this timezone to your timezone or some different timezones. Mainly there are 24 timezones. But you can see a whole list of timezones by the following command in your Linux system. ls /usr/share/zoneinfo/  Now to set your timezone, use the following commands: rm /etc/localtime ln -sf /usr/share/zoneinfo/your_time_zone /etc/localtime You can use date command to check and verify that change in timezone worked. For example If you want to change your localtime zone to Dominic Republic's time then you would do: rm /etc/localtime ln -sf /usr/share/zoneinfo/America/Santo_Domingo Similarly for Kathmandu, you would use, ln -sf /usr/share/zoneinfo/Asia/Kathmandu 

Enabling Development mode on Roku

Image
Roku, by default has Development mode disabled. Without enabling we can't compile and install our custom application on Roku. That is the installer page won't be accessible without enabling development mode. For example, ip address of your Roku device is 192.168.1.12 then you can't access http://192.168.1.12/ which is the installer page for the Roku.To enable 'development mode' in Roku press the following combination on your Roku remote: Home  key -3 times, Up key 2 times, Right key, Left Key, Right Key, Left Key, Right Key If you hit the combinations as above, you'll be taken to the developer settings page. You need to scroll down the long text which has terms and agreement to Agree and enable developer mode. Once you have enabled developer mode, You can access the installer page of your device at http://ip_of_roku/ for above case, it should be http://192.168.1.12 For packaging and inspection you'll need password, and to generate password, telnet to