Posts

Showing posts from May, 2013

How to record video and upload to Youtube from your website

Image
This is the simplest method of using Youtube Widget in your website or blog. To upload vidoes to youtube. The code is as follows: <div id="widget" style="width:355px;"></div> <script>       var tag = document.createElement('script');       tag.src = "https://www.youtube.com/iframe_api";       var firstScriptTag = document.getElementsByTagName('script')[0];       firstScriptTag.parentNode.insertBefore(tag, firstScriptTag);       var widget;       var player;       function onYouTubeIframeAPIReady() {         widget = new YT.UploadWidget('widget', {           width: 500,           events: {             'onUploadSuccess': onUploadSuccess,             'onProcessingComplete': onProcessingComplete           }   ...

How to install nodeJS in linux from source

Image
Since you are reading this post : 'How to install nodeJS in linux from source', my assumption is you are a linux user. and want to do some cool stuffs with nodeJS but you wonder how to start, how to install nodeJS. First thing to do is download nodejs source files from http://nodejs.org/dist/v0.10.9/node-v0.10.9.tar.gz  . This is the latest version of nodeJS available while writing this post. Also from command line you can do this:  wget http://nodejs.org/dist/v0.10.9/node-v0.10.9.tar.gz  Ok, now that we have downloaded nodeJS, we will extract the files, from console run the following command and go to the directory where the files are extracted as follows: tar -xvzf node-v0.10.9.tar.gz cd node-v0.10.9/ Now that we have extracted all files, make sure you have all the development tools installed. If not for fedora /centos/redhat users : sudo yum groupinstall 'Development Tools' Once the development tools are installed now, run the following commands: ./co...

Domain Name Resolution with Amazon's Route 53

Image
Domain Name Service of Amazon Web Services is know as Amazon Route 53. Its a great service to manage, domain names and load balancing on multiple servers. In this post, I am going how you can configure Route 53, so that your domain points to the EC2 instance you own. First of all you need to own a domain and have account on Amazon Web Services. Once you have these get ready to go for the configuration. Its not that hard to configure, but if you don't get it then you won't be able to have your domain resolved to your EC2 instance.  First thing you need to do is open you Amazon Console and go to Route 53 Services. There you can create a hosted zone. And you'll get about 4 name server details, that you need to update in your domain registrar.The hosted zone should have your domain as example.com. And now click on the hosted zone and create record sets. First record set should be an A record. For this name should be example.com and value should be the ip of your EC2 in...

GitHub introduces sudo mode

Image
GitHub, the Social Coding Web Platform is introducing a new concept. Its taken from the *nix systems: Unix /Linux. In the *nix systems, to avoid haphazard actions leading to cause there is a mode called sudo mode. In this mode, to makes changes or for any operation that can cause severe results, the systems asks for password before execution. This way many possible hazards are reduced. The very same concept is being introduced by GitHub for more security. Thus GitHub will be requiring to enter password for some actions that have severe effect. For example to list some of the activities that will require password are: Adding public keys Adding email address This is definitely a good step of GitHub. Yes, of course, it is not going to ask for password continuously for all the actions so that won't be bothering. 

Successful 10 years of WordPress

Image
WordPress is a very popular open source content management system. Not just a content management system but some also say it to be a PHP framework for web development. What ever, WordPress is very popular in the PHP community for developing simple blogging sites to enterprise and high scale e-commerce solutions. The great number of available plugins and themes make it a good choice for developers. WordPress was developed by    Matt Mullenweg  and  Mike Little  on 27th May of 2003. And now it is 10 years old already. It has a download of 21 million times. And the latest release till date is WordPress 3.5.1 downloadable from  http://wordpress.org/download/  . WordPress is in about 66 million websites to the date. The number is growing everyday. Its in 120 languages. WordPress communities around the world celebrate 27th May as WordPress Anniversary. This year it was the 10th Anniversary.

Google shutting down its services

Image
The giant Google has been doing upgrades and updates in many of its field. Its also retiring some of its services. This year on Google I/O, Google turned out to be enhancing most of its services for Android, Web, Music, Gaming, Google+ and more. But yes it is also discontinuing some of its services. Google one of the discontinued service is Google Checkout. Google Checkout has is going to be completely disabled now. The last date of Google Checkout would be November of this year. However, Google is enhancing it as Google Wallet. Though Google Checkout is discontinued, Google wallet is going to be more enhanced. So if you are using Google Checkout then you should think of it soon. Another discontinued service of Google is Google Buzz. Its going to be completely discontinued by Google. The existing contents will remain. But no new contents can be added now in Google Buzz. Its a farewell to Buzz. 

Date Converter - AD to BS and BS to AD

Image
Here in this post, we are going to learn to use a very useful PHP library for date Conversions . You can download the library from http://adf.ly/PXdXQ  . The file contains the library file nepali_calendar.php and an example file ' example.php ' zipped in. This library can be used for conversion of dates in AD to BS and vice-verse. Besides date conversion there are a few helper functions too like checking leap year, getting name of the month, getting day of the week and so on. However, the library has limitations. The limitation is on the range of date that can be converted. For AD to BS conversion the range is 1944 to 2022 and for BS to AD it is 2000 to 2089. You can also extend this library for yourself. A simple usage of the library is: <?php include 'nepali_calendar.php'; $cal=new Nepali_Calendar(); print_r($cal->eng_to_nep('2013','09','04')); //for ad to bs conversion print_r($cal->nep_to_eng('2070,'02','10'));//...

Fixing ' Unable to access mount point: Transport End Point is not Connected' in amazon ec2

Image
In our previous post, we discussed how we can mount Amazon S3 bucket into an Amazon EC2 instance. Now in this post we are going to discuss how you can solve a issue that occurs with this kind of mounting over HTTP in Amazon Web Services First unmount the bucket, for this we use the following command: fusermount -u directory_where_bucket_was mount Mount the bucket again: s3fs bucket_name directory _where_bucket_mounts

Headers already sent by PHP

Image
While working in PHP, you might come to this weird situation where you want to redirect to a page or send header information and you get this warning ' Headers already sent '. In this post, I am trying to help you get this issue solved. The first thing you can do is check if headers have already been sent or not. To check this the function you need to use is headers_sent(). For example: if(!headers_sent()){    //headers not sent you can send header }else{ //headers already sent } This is just a simple method to test if headers were sent or not. Now what we wanted to do here is to send headers even if the headers went sent. To do this, there are a few steps. First thing to do is start output buffering on top of the page. This can be done by the PHP function ob_start();.   So output buffering has been enabled. Now we want to check if headers were sent if they were sent then we need to clear them. TO do this we check for the status, and if its not clear then we do clear...

Mounting Amazon S3 bucket into Amazon EC2 [ CentOs ]

Image
Recently, I have been working on Amazon Web Services. I have been using Amazon S3, RDS, EC2 extensively.  For my recent project that I am working on, I have a WowzaMediaServer running on a m1.xlarge instance [ cent os 6.3  x86_64 ]. And I have a bucket named fiercecaptial. What my situation is I need to mount the bucket in Amazon S3 into Amazon EC2 instance. Now, my friend to help me do this is s3fs , which I need to download. Well I suggest you to download the latest version. Once the latest version is downloaded what we need to do is extract the file. 'tar -xvzf filename.tar.gz' would help you extract the files. And the other step to get it installed is pretty easy: ./configure --prefix=/usr make sudo make install These are the common steps that you need to follow and this should help you get your s3fs installed.  And incase you have not installed your development tools that are required to compile the souce code then you need to run the following commands:...

Google I/O Extended 2013 with NOSk

Image
Google I/O Extended 2013 was organized by Nepal Open Source Klub supported by GDG Kathmandu and Nepal College of Information Technology. The event was a huge successful event. Here is a video from the event. Some photos from the event are also as follows.

Google App Engine Applications can be written in PHP

Image
Hurrayyy!!!!! A great news for all the PHP Developers is here. Now Google App Engine Applications can be written using PHP. Yet the news is unannounced. Still you can get started with Google App Engine Applications with PHP. Its in experimental phase and so there are limitations with the SDK. Before it gets publicly announced you can still write your applications write away in PHP for Google App Engine and check in your development server. The SDK is available for all 3 major operating systems: MAC, Linux and Windows. Why use Google App Engine with PHP? Speed and scale of App Engine is high  Simplicity and easy to adopt  Native PHP interpreter Managed and highly available MySQL support via Google Cloud SQL Runs other PHP frameworks and CMS To deploy your application on live server with the limited preview you need to register your application at  https://gaeforphp.appspot.com/  . Documentation of Google App Engine PHP SDK is available at  https://developers...

Google I/O 2013 Day 1 Keynote in brief

Image
900 Million android activation 48 Billions Apps installed on android devices from play store Android Studio for Developers GCM API Google Maps API 2 WebP decrease size of images by 31 % compared to JPEG images Radio without rules Google Play for Education Galaxy S4 on stock from Google Play Store for $649 Google Play Music All Access $9.99/month Related hash tags in Google+ for depth details Image enhancement using Google+  Google Now

Google I/O Live 2013

Image
Today is the First day of Google I/O 2013. If you wondering where to watch it  then you can watch here right in this blog or you can check the following link:   http://www.youtube.com/embed/XclVwJP5GdM  or  https://developers.google.com/events/io/  .

Do you know 11 days went missing in 1752?

Image
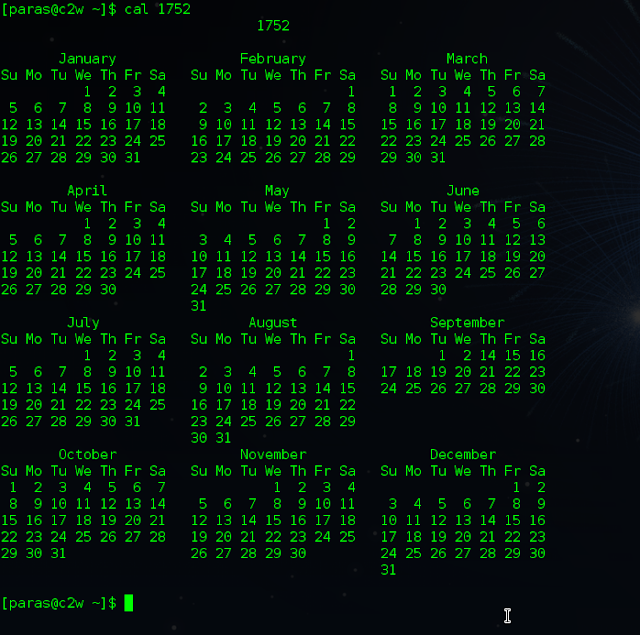
Do you have a calendar of 1752? No. Well then why don't you use your Linux box to see the calendar or you can check in any of the online calendar or your phone too. Well the interesting thing about this year if you noticed in the picture then 11 days went missing from this year. Check the image again, September: You will see after 1,2 the date suddenly jumps to 14. Oh God, what happened? 11 days missing? Well this has an interesting story that's what I wanted to share with you all. If you check Wikipedia for the year 1752  .You'll see this entry July–December September 2  –  Great Britain  and the  British Empire  adopts the Gregorian calendar, meaning the Julian date of Wednesday, September 2 was followed by the Gregorian date of Thursday, September 14. While shifting the from Julian Calendar to Gregorian Calendar the dates were wiped off. And According to Julian Calendar New year was on 1st April but according to Gregorian Calendar January was ...

Google Drive triples free storage

Image
Google Drive is a Google's cloud storage service. Its API has allowed integration with various other applications. Files are easily uploaded, shared, synced with Google Drive. It has been a great collaboration tool. The number of file formats support is increasing as the number of applications using Google Drive API are increasing. Almost all of the files we generally use can be opened and edit by applications that are integrated with Google Drive API. Google drive initially offers 5 GB of space shared with GMail, G+ Photos and Google Docs. There are paid upgrades available for those who need higher storage capacity then 5 GB. According to a post, Now Google Drive is supposed to triple the free storage with 5 GB for G+ Photos, 5 GB for Google Docs and 5 GB for GMail summing to 15 GB of free data storage capacity. However the premium upgrade plans are still there with a lot more options.  Google Drive is available for window, Linux , Mac and smartphones too. Below is pictu...

Happy Birthday Facebook CEO Mark Zuckerberg

Image
Mark Eliot Zuckerberg, Chairman,  CEO and also one among the five co-founders of Facebook Inc turned 29 today. He was born in May 14, 1984 in New York City. He is a Havard dropout. He launched Facebook from a room at Havard College with his college room mates in 2004. He is the second youngest self made billionaire. He became billionaire in 2007 because of Facebook which is the largest social networking website. Today its Marks birthday so, wishing him 'Happy Happy Birthday' from http://tuxkiddos.blogspot.com . To know more about Mark you can follow him in facebook :  http://www.facebook.com/zuck  .

Google I/O Extended -013 With NOSK

Image
Since, 2008 Google has been hosting Google I/O every year to launch its products and services. Google I/O Extended is a part of Google I/O event in which group of people, communities watch the event live. And this time Nepal Open Source Klub [ NOSK ] is hosting Google I/O Extended at Nepal College of Information Technology with co-ordination from Google Developers Group Kathmandu [ GDG Kathmandu ] and Nepal College of IT [NCIT]. Event Page:  https://plus.google.com/u/0/events/c6op6cv3ludn29tetc1p6h65ohc Registration Form:  https://docs.google.com/forms/d/1EgC-D1IdlAAJfThAmsg8i00zp0226LFR4w2SwiZXCqI/viewform  . Maps: View Larger Map

10 years of LinkedIn

Image
LinkedIn ,the largest social network of professionals has turned 10 years. It started from a room with a couple of friends in 2003. Though, initially it had slow growth but in these 10 years journey, LinkedIn has turned out to be the largest social network of professionals. A basic timeline of LinkedIn is as follows: 2003: Started, had very slow growth 2004: Introduced contacts book 2005: Went into commercialization, jobs posting and subscriptions 2006: Started profiles for users 2007: CEO changes, Customer Service Center 2008: Internationalization and Localization [ Spanish , French ]  2009: New CEO, clear vision and mission of LinkedIn 2010: Huge growth 90 million members, 1000 employees 2011: Becomes publicly traded company 2012: Change of architecture of the site 2013 : Largest social network of professionals with 225 million members The following slideshow also shows the basic timeline of LinkedIn of the 10 years. Also, you might like to check ...

Choosing PHP Framework

Image
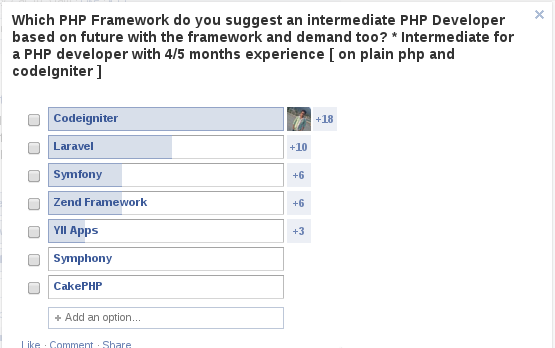
This is the screenshot of a poll question I posted on PHP Developers Group Nepal on May 07, 2013. And today its one week of the poll. The screenshot shows the result of this week. The result shows that most of Nepali Developers recommend CodeIgniter which is 41.86 %. The next recommended is Laravel 23.25%. With Symfony and Zend each with 13.95 % vote followed by YII 6.97%. Thanks to all those who helped with this poll question. Hope this result makes other beginner PHP Developers too who want to start working on PHP Frameworks. 

Check web domain availability using python-whois

Image
In this post, I am going to show you, how you can use python to check domain availability rather to go to godaddy.com or any other domain lookup website to make this check. Oh yeah that means you can use this to find out the available domains too. Well lets get started. First of all you need to install python-whois. You can do this using your favorite tool pip. Its just a single step. pip install python-whois to verify that python-whois is installed its even more easy. python -c 'import whois' Successful installation means you get no errors running the above command. If you get 'No module named whois' then this means you are installation wasn't successful. Not that python-whois installed, we are ready to start using it. Lets do it by not saving in a file but opening python interactive shell and explore. To open python open terminal and hit enter after typing python. You should be in the python interactive mode >>> import whois >>> result=whois.whoi...

Sending mail using SMTP authentication in CakePHP

Image
This is an example of sending email using GoogleMail SMTP authentication. You can give a try in CakePHP, this would definitely be helpful. <?php class ExampleController extends AppController{           public $name="Example";           public function sendsmtpmail(){ $this->Email->smtpOptions = array(                                                                  'port'=>$smtp_settings['email_settings']['smtp_port'],                                                                   'timeout'=>$smtp_settings['email_settings']['smtp_timeout'],           ...

Installing CakePHP

Image
CakePHP is a rapid web development framework for PHP language. And yeah I believe you are here to read this post only because you want to get started with CakePHP. And if its not then probably you want to know more about CakePHP, for more details why no you check this out :  http://cakephp.org/  ? Okey now lets get started. Download the latest version of CakePHP from GitHub  or clone it. Extract the archive file to the webroot directory i.e. for apache2 its /var/www/html and if you are on windows then for xampp it would be htdocs and for wamp it would be www. And if you are on a cpanel hosted web server then it would possibly be /public_html. So anyways you should be able to place all the files to your webroot directory. Now the directory structure should look like this: ->app ->lib ->plugins ->vendors ->index.php ->travis.yml ->.editorconfig ->.gitignore ->CONTRIBUTING.md ->README.md -> build.properties -> build.xml -> index.php app...

First Firefox OS App Day on June 1st

Image
With the release of Firefox OS for mobiles. Mozilla Nepal like other Mozilla community is going to organize an event 'Firefox OS App Day' on June 1st, 2013. The event is basically an introduction of Firefox OS and Apps Marketplace to Developers community in Nepal. Thus eventually a session for developer has been focused to introduce Developers to Firefox Apps Development through 'App Hacking Session'. The schedule of the event day as planned by Mozilla Nepal Community is as follows: 08:00 AM - 09:30 AM : Registration, coffee and light breakfast 09:30 AM - 10:00 AM: Introduction to Firefox OS and Apps Marketplace 10:00 AM - 11:30 AM : Open web app development workshop 11:30 AM - 12:00 PM : Other light sessions and QA 12:00 PM - 01:00 PM : Lunch 01:00 PM - 05:30 PM : App hacking session 05:30 PM - 07:30 PM : Demos, Socializing Though the event is free, pre-registration is mandatory to participate in the event. Also, the number of participants are limited...

unable to load dynamic library timezonedb.so

This is an error that I found in my error_log file. It was consuming huge amount of memory. The error is quoted as follows:  "Unable to load dynamic library '/usr/local/lib/php/extensions/no-debug-non-zts-20090626/timezonedb.so' - /usr/local/lib/php/extensions/no-debug-non-zts-20090626/timezonedb.so: cannot open shared object file: No such file or directory in Unknown on line 0" If you are one facing this problem then you can fix it by installing the timezonedb php extension. To do this you need to run the following command in your terminal. pecl install timezonedb Point to note is that timezonedb needs php-devel package, so if you have not installed then make sure you install it.

hack_me level 2

Image
We published our hack_me level 1 on April 27,2013 in the blog post at  http://tuxkiddos.blogspot.com/2013/04/hackme-level-1.html  . And today we are back with the next level of hack_me. This is level 2. Its a little complicated than level 1. And yeah you'll definitely find it more interesting than the first level. You can download hack_me leve to from  http://adf.ly/PIIci . And give it a try. Besure you are using linux system and please before running the hack_me file you need to make it executable. Easiest way is to open terminal and hit chmod +x hack_me2 And then you can run the hack me file by the command: ./hack_me2 Once you crack this you can comment below or write to me. The credit of this hack file again goes to Bishnu Bidari. Be tuned we will be back soon with next level of hack me.

Installing php_zip on Linux

Image
This is an error that I encountered with while using PHPExcel . It i s a library written in pure PHP and providing a set of classes that allow us to write to and read from different spreadsheet file formats, like Excel (BIFF) .xls, Excel 2007 (OfficeOpenXML) .xlsx, CSV, Libre/OpenOffice Calc .ods, Gnumeric, PDF, HTML, etc. This library is built around Microsoft's OpenXM L standard and PHP. The requirements of this library are : PHP version 5.2.0 or higher PHP extension php_zip enabled (required if you need PHPExcel to handle .xlsx .ods or .gnumeric files) PHP extension php_xml enabled PHP extension php_gd2 enabled (optional, but required for exact column width  auto-calculation ) While I was working on a project, I didn't check if all dependencies for PHPExcel were met. I wrote the program. It was fine when I was writing to the old .xls file format but as I wanted to write for .xlsx I got this error. This error was a resultant of unmet dependency of php_zip. Fatal error : ...

Facebook no longer supported in tweetdeck

Image
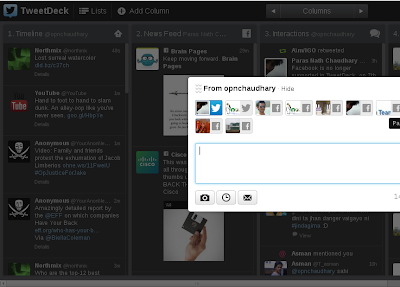
TweetDeck is the most powerful  Twitter tool for tracking real-time conversations. It has been popular because of its flexibility and customizable layout. TweetDeck is the most used Twitter client on desktops. But now TweetDeck is no longer going to support Facebook. From May 7, 2013, TweetDeck will have completely removed Facebook integration. All columns in TweetDeck will be automatically removed. TweetDeck has been available as chrome extension, TweetDeck for Android, TweetDeck for iPhone and TweetDeck Air. All these are to be unavailable from May 7. The team has been decided to focus on web version on TweetDeck. This means, though TweetDeck will be gone from iPhone, Android, Desktop as standalone Twitter client. It will be still accessible as a web version application. Using the capabilities of modern browsers, TweetDeck is being developed in web version which is to  supposed be fast and feature rich. This time TweetDeck is using the latest Tw...

Post tweets to twitter using python

Image
This post is about how python can be used to post tweets in twitter . To get started with this we need to install twitter for python which can be done from  http://code.google.com/p/python-twitter/  . It really has a very good documentation of installing twitter. To verify the process is similar like other ones, you just need to run "python -c 'import twitter" in terminal and if no errors intallation was successful. That means we can proceed. Lets create a twitter application now. To create a twitter application go to  https://dev.twitter.com/apps  .Once you create the application you need to put Access token, Access token secret, consumer key, consumer key secret into the code as follows: #!/usr/bin/python from twitter import * t=Twitter(auth=OAuth('Access token', 'Access token secret', 'Consumer Key', 'Consumer Secret'))         status_text=raw_input('Enter your message: \n') t.statuses.update(status=status_text,source="http:...

Update Facebook status using Facebook Python SDK

Image
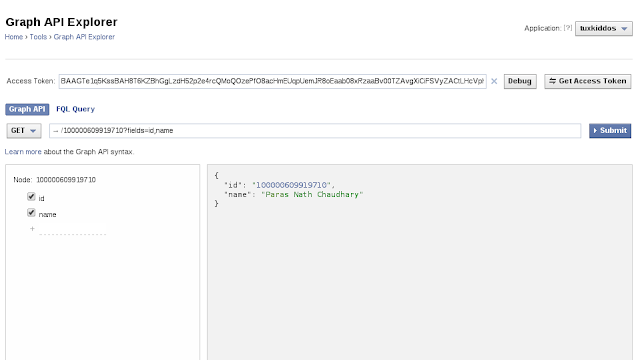
In this post I am going to show how you can update your Facebook status using python. The first and foremost thing to do is install Facebook for python. You can do this by downloading or cloning from  https://github.com/pythonforfacebook/facebook-sdk . Installation is quite easy. Unzip the file and run 'python setup.py install'. To verify Facebook Python SDK is installed you can run "python -c 'import facebook'". This should do absolutely nothing. No errors. If you get any error then Facebook SDK is not installed. Once Facebook SDK is installed, you can login to  http://developers.facebook.com/ . And create a new app. I believe this much you can do by yourself. Once an app is created in Facebook. Now open Graph API Explorer   which should look like as follows: Here you need to do is get Access Token by clicking the 'Get Access Token' button on the right top side. In the screenshot you can see the Access Token is displayed on the text field. Copy this t...

Exporting a table into csv file

Today I was working on a website, and I came into this situation where I had to export all the entries in the database into a csv file. So in this post, I am going to explain how I did this. If you are using CodeIgniter then you should better check out  http://writephp.blogspot.com/2013/02/export-to-csv-ci-helper-file.html  where I have written how the simple CodeIgniter helper file can be used. But if you want to do using some hard core php then you should try this out. Here's the sample code: <?php     $table='tablename';     $DB_HOST = "host_name";     $DB_USER = "db_username";     $DB_PASS = "db_pass";     $DB_NAME = "databasename";     $con=mysql_connect($DB_HOST,$DB_USER,$DB_PASS);      if(!$con){ die('Database connection failed:'.mysql_error());     }     $db=mysql_select_db($DB_NAME,$con);     if(!$db){ die('Database selection failed'.mysql_error());   ...

LinkedIn Mentions and Networks

Image
LinkedIn the professionals social network has come up with this new feature that has been available in twitter and Facebook of mentioning. LinkedIn now enables the feature of mentioning your connections. Mentioning a connection means to send a notification to the one mentioned. That really makes the conversation to be more real-time, i.e. quick responses. And getting informed about who is talking about you. Though this feature was announced by LinkedIn in April 4, 2013. Its available for all from today. Right now you can check this out. Details of this feature is at  http://blog.linkedin.com/2013/04/04/start-a-conversation-by-mentioning-your-connections-on-linkedin/ . The way it works is whenever you are to share or make a comment you start with the character '@' and a list of your connections will be listed as you type they will be sorted and filtered. You can select one from the list for mentioning. That's the way it works. Mention Feature in LinkedIn The other ...